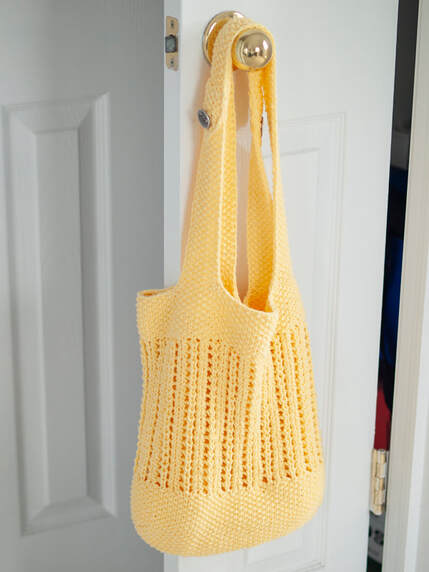
I have a new pattern which I have just uploaded to my website, the BYOB Market Bag. This is a sister pattern to the BYOB 2.0 – Bring Your Own Bag but has been worked in just a single colour and features long handles to make it easy to carry on your next visit to the Farmers’ Market.
Over the next few weeks I will be added a series of blogposts with tips and techniques for working this bag in a special tutorial / knit‐along series.The blogposts will cover:
So please join me as we work together to knit your very own BYOB Market Bag . . .
Over the next few weeks I will be added a series of blogposts with tips and techniques for working this bag in a special tutorial / knit‐along series.The blogposts will cover:
- Pre‐washing of yarns and why we would want to do that
- Selecting yarns & working gauge swatches
- Working Provisional Cast Ons
- Selecting alternative stitches and working selvedges
- Picking up stitches
- A new technique for working a 2-row SSK
- Adding handles to your bag
- Finishing ideas and suggestions, including adding a lining
So please join me as we work together to knit your very own BYOB Market Bag . . .
Pre‐washing Yarns
In the pattern, I have included the note: "Preferably pre‐wash your yarns as cotton yarns have a tendency to shed colour when first washed."
Now of course, this isn't absolutely necessary, but is something I've done ever since I first started hand‐spinning. Washing your final yarn is a vital part of hand spinning and helps to set the twist. It also relaxes the fibres that have been put under tension during the spinning process and brings out the best in your finished yarn.
Commercially produced yarns also suffer from the same tensions inherent in the production process, and this can lead to a slight stretching. Ever worked a tension swatch only to see the numbers of stitches and rows in 10cm/4 ins change a lot after washing? That may be because the yarn was just ever‐so‐slightly stretched in the ball and can now relax.
The opposite can also sometimes happen: the washing process can allow the fibres in the yarn to slide into a more comfortable position, causing the final item to stretch. Now you have a garment which might fit a large gorilla! So washing takes away possible tension surprises.
Another good reason to pre‐wash your yarns is because commercial yarns often have spinning oils or other "finishing" on them. This can make the balled yarn appear a little harsh, or firmer than you might expect it to be. In a skein, this can be easily washed out, but once knitted it gets harder to remove these finishings. It's also preferable to be knitting with a soft, fluffy yarn rather than one that feels a little stiff and scratchy in your hands.
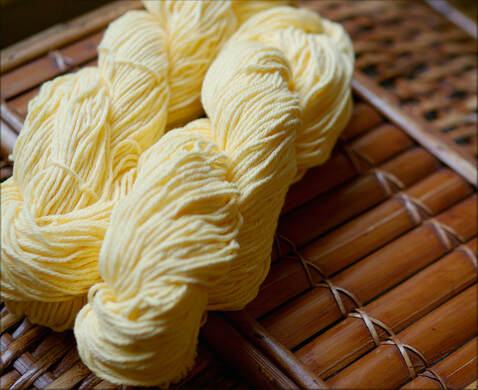
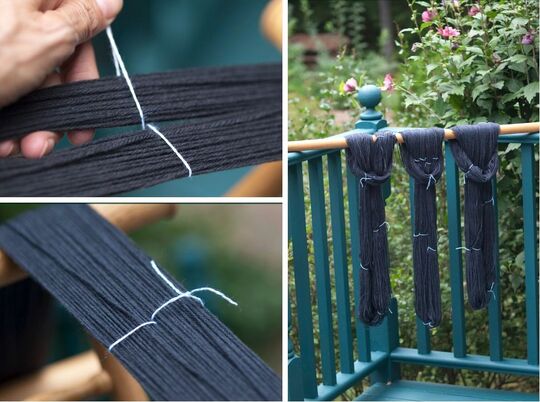
The photo above shows two balls of Zealana "Willow" yarn, showing how the yarn "bloomed" and softened on washing. On the left, you can see an unwashed ball with a slightly crisp finish, while on the right the washed yarn is now fluffy and soft.
Thirdly, the dyes may not have been completed washed off the surface of the yarn. You hope that most of the dyes will have penetrated the "core" of the fibre and won't dislodge as you work. However, some of the colour might not be firmly enough attached. Washing will remove this excess dye so that it won't migrate into the next colour band after the item has been completed. This happens a lot with cotton and certain dyes also have a harder time penetrating right into the fibre core.
And lastly, pre‐washing gives you a chance to "meet" your yarn. By the time you have finished, it will have passed through your hands not once but twice, giving you the chance to find out where the flaws are and to note down all the possible joins. Again, this just helps to remove some of those unwanted "surprises" that we all encounter when we are knitting!
Winding your yarn into a skein
Some yarns are already in a skein when you buy them, but many are in a ball or a cone instead. So to wash your yarn, you first need to wind it into a skein.
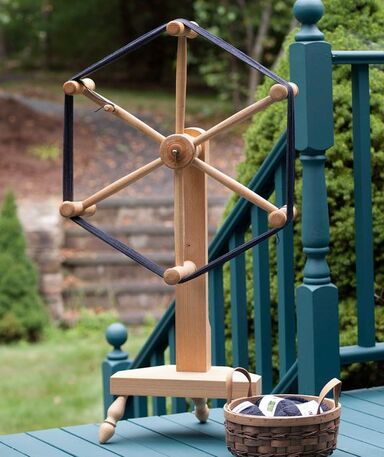
There are a number of ways of doing this. Starting with the most expensive (well, why not!), you can use a freestanding skein winder (see the photo at the top of this blogpost). The advantage of this is that it is fast, efficient and gives your dear husband an excellent excuse to buy you something beautiful for your birthday. (Thanks, Tim ‐ you're a star!!)
Some yarns are already in a skein when you buy them, but many are in a ball or a cone instead. So to wash your yarn, you first need to wind it into a skein.
There are a number of ways of doing this. Starting with the most expensive (well, why not!), you can use a freestanding skein winder (see the photo at the top of this blogpost). The advantage of this is that it is fast, efficient and gives your dear husband an excellent excuse to buy you something beautiful for your birthday. (Thanks, Tim ‐ you're a star!!)
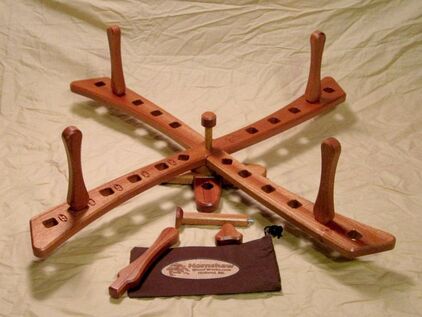
Mine was made by Reeves and is, sadly, no longer available. However, newer versions can be found on-line and antique skein winders often come up for sale too. There are also some lovely skein winders on Etsy, such as the one in the photo above which was made by Hornshaw Woodworks.

An alternative method is to use a Niddy‐Noddy. This has a short central stick with the two end arms at right angles. The skein is formed around the arms of the Niddy‐Noddy in a fairly hypnotic action. These come in all various sizes with the usual being 2-yards long. However, you can also find shorter ones such as this cute little travel sized Niddy‐Noddy from Grandmavee’s Etsy store.
Lastly, there is the free option of winding a skein around your arm. Just bend your arm and pass the yarn first around your elbow and then between your thumb and first finger. The skein produced is fairly short this way, but at least you always have this option to hand!
Lastly, there is the free option of winding a skein around your arm. Just bend your arm and pass the yarn first around your elbow and then between your thumb and first finger. The skein produced is fairly short this way, but at least you always have this option to hand!
Adding figure-of-eight ties
Once you have your skein wound, secure it in several places with figure‐of‐eight ties so that it will not come adrift. You will need about 6-8 of these around the whole skein to hold it securely in place. It is a good idea to use contrast coloured ties so you can easily find them later.
Then carefully hand wash the skeins using the product that you intend to use for the final item and rinse until no more dye comes out. Take the worst of the water out by rolling in a towel or giving the skeins a quick spin and then hang them up to dry, unweighted.
Winding your yarn into a ball
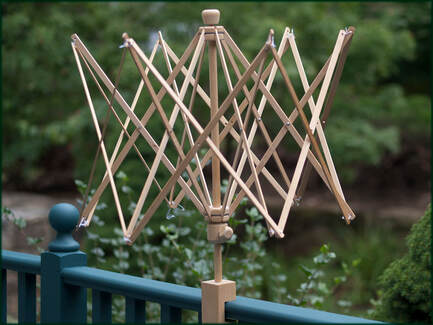
When you wish to wind the skein into a ball again, place it onto an umbrella swift and remove the ties.
If you don't have one of these useful devices, then ask the nearest passing niece or nephew to stand for five minutes holding their arms out while you wind a ball. Gotta love these free alternatives!
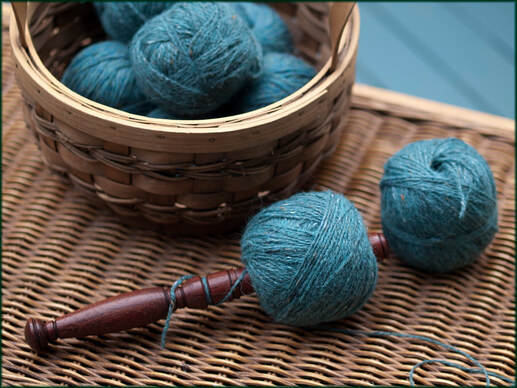
Wind it into a ball either by hand or using a ball winder if you prefer. You can also use a fancy wooden device called a Nostepinne / Nostepinde to produce a centre pull ball.
Then you're all set. It doesn't take as long as the foregoing spiel makes it sound! However, it is worth this extra step to ensure that when you do start knitting, the results will be just as you want them to be.
Next time...
Next time we'll be looking at yarn choices and how to measure your gauge, so join me for the next in this tutorial series.
Happy Bag Knitting!
Moira
 | Last Blogpost: New BYOB 2.0 pattern Next up: Market Bag Knit‐along #2 – Yarns & Gauge Our book: Reversible Knitting Stitches My Website: www.wyndlestrawdesigns.com |
Keywords: Patterns/Bags, Tutorials/BYOB Market Bag Knit-along,
bag, bags, knitted bag, mesh bag, market bag, cotton, washing yarn, pre-washing yarn, skein, winding yarn into a skein, skein winders,
bag, bags, knitted bag, mesh bag, market bag, cotton, washing yarn, pre-washing yarn, skein, winding yarn into a skein, skein winders,
