30 September 2013

Market Bag Knit-along #8 - The BYOB Market Bag

BYOB Market Bag by Moira Ravenscroft, Wyndlestraw Designs
So we come to the last of this series of blogposts on working the BYOB Market Bag. If you have just joined me here, then please click here to see the very first post in this series, then follow the links at the bottom of each page until you get back to this point.

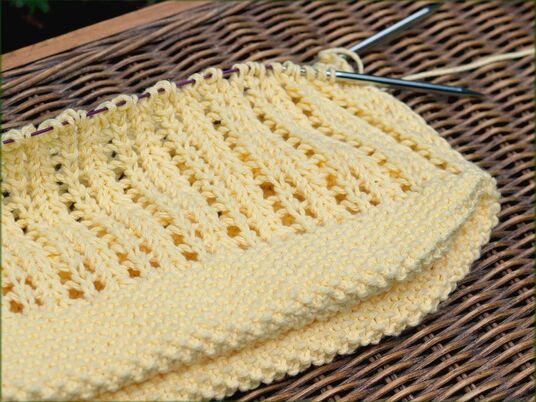
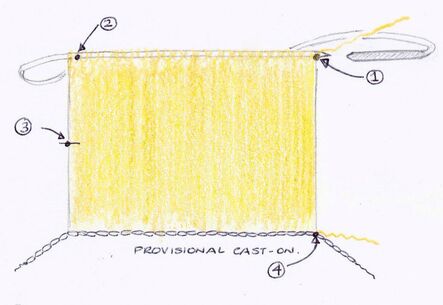
In this series, we have been looking at tips and techniques for working a stylish and practical shoulder bag for your next trip to the Farmers’ Market. We started with a discussion about why it is important to pre-wash your yarns, then we looked at gauge swatches, yarn choices and how to work a selvedge. We explored Provisional Cast-Ons and also found a new technique to work an SSK by dividing the working over two rounds. Then we looked at options for adding handles and finishing the bags.

However, one thing remains – and that is whether to line the bags.
  • An unlined bag can stretch to accommodate whatever you want to put inside, but won’t take something heavy without sagging.
  • A lined bag is stronger but much less flexible.
So have a think what is more important to you.

Lining Options – a) Lightweight lining

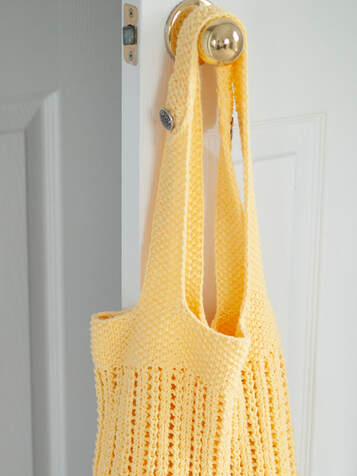
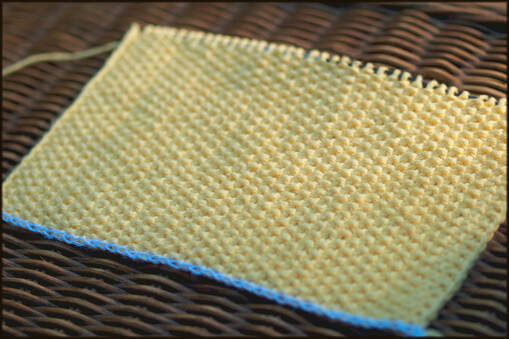
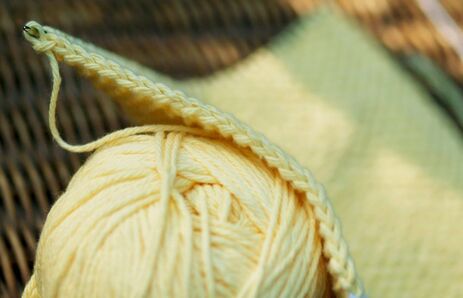
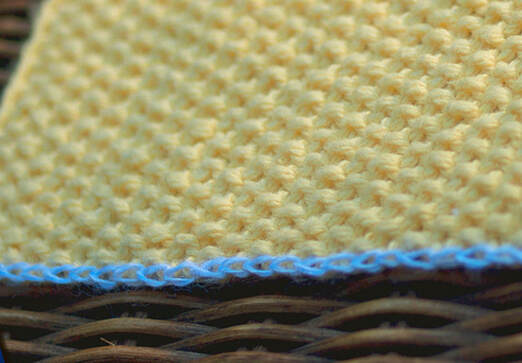
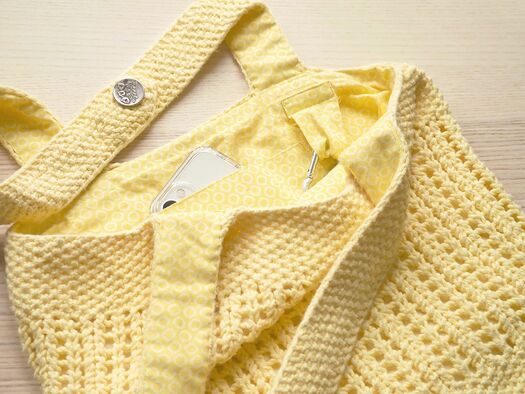
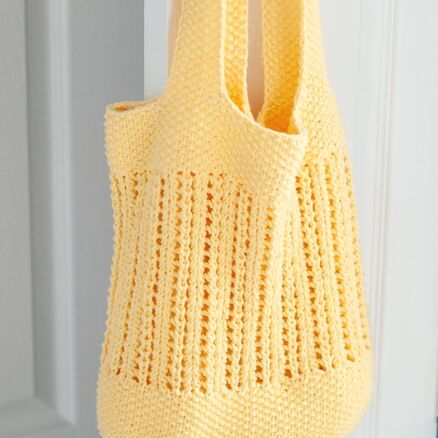
If you do decide you’d like to line your bag then there are three options. The first is to add a very lightweight lining as in the photo above. One of the features of the BYOB Market Bag is that it is light and easy to use, so adding a lightweight liner would seem to be a good choice.

For this bag, I used a very lightweight cotton dress fabric and cut the base to suit the dimensions of the base of the knitted bag. However, for the sides I added a little extra width compared to the unstretched width of the bag and added little pleats at the base when I sewed them in place and then again at the top. This means that I have not lost too much of the flexibility of the bag and it still remains fairly light too.

I added a pocket at the back for my phone and can clip my keys onto a small tab with an attached carabiner hook. This has made a very practical day-bag and I find I am using this one a lot.
Weymouth Shoulder Bag by Moira Ravenscroft, Wyndlestraw Designs
b) Medium-weight lining

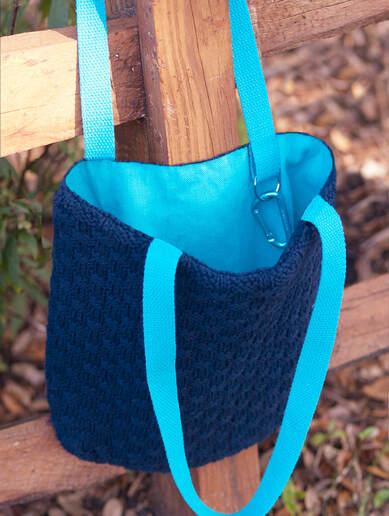
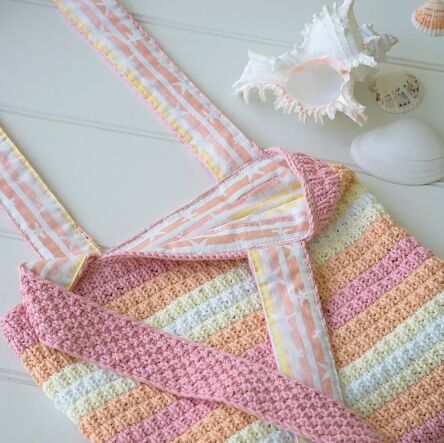
A second option would be to use a slightly thicker cotton fabric as I did with the Weymouth Shoulder Bag which you can see in the photo above. This is a “craft fabric” weight which is often sold for quilting here in the USA. In the Weymouth Shoulder Bag, the fabric fits the bag dimensions more closely and I have also inserted a piece of plastic canvas at the base for extra strength.

This gives a sturdy bag which can easily carry bottles of milk or cartons of orange juice. The plastic canvas base also means that the bag does not sag in the centre when items are added, so is nicely stable.

Something similar to this could be used for your BYOB Market Bag. So if you like this idea, have a look at the Weymouth Shoulder Bag page on my website here for more photos and information.
Sarasota Shopper by Moira Ravenscroft, Wyndlestraw Designs
c) Purchased bag liner

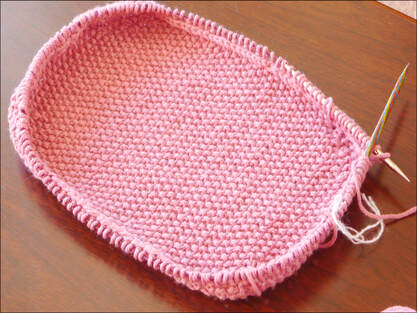
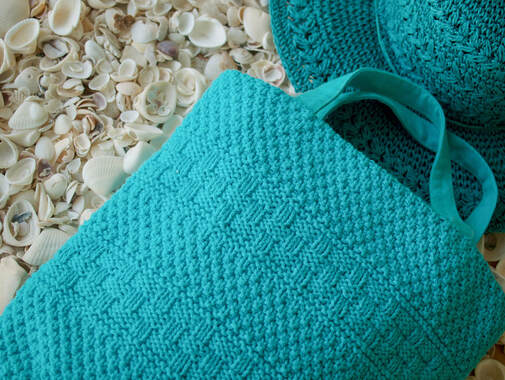
Then thirdly, it would also be possible to use a purchased bag as a liner for your new BYOB Market Bag. There are many lightweight cotton bags in the shops and you can also find them in supermarkets and on-line sites too, so it should be fairly easy to find just the right-sized liner for your new bag.

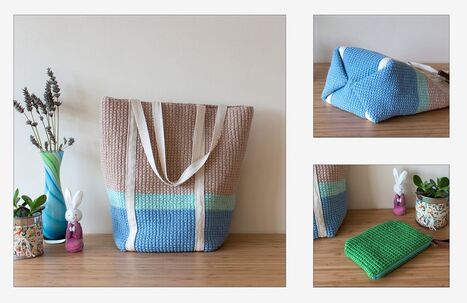
Of course, if you haven’t already started your Market Bag then you could design it with the liner in mind. I did that with the Sarasota Shopper in the photo above. This uses a fairly heavy-weight cotton tote from a craft store, which I then dyed. I then designed the outer knitted shell with the same dimensions so that they fit together well.

I have so enjoyed using this bag and it is still in frequent use even after 10 years! After I made this one, I then went on to knit a whole range of bags with this one idea and you can see the full set of five bags in the Southampton Collection here. I especially like the Southampton Book Bag from this collection as I do find shoulder bags so practical. The BYOB Market Bag is also great from this point of view.

The good thing about a purchased liner is that there is minimal sewing involved. All you would need to do is to attach it at the top edge. Or you could leave it unattached and just find a way for it to hang over the handles inside the bag. Then you would have the best of both worlds – a flexible unlined bag when you need one and a stylish alternative to a simple cotton bag when you want to carry a bit more weight.
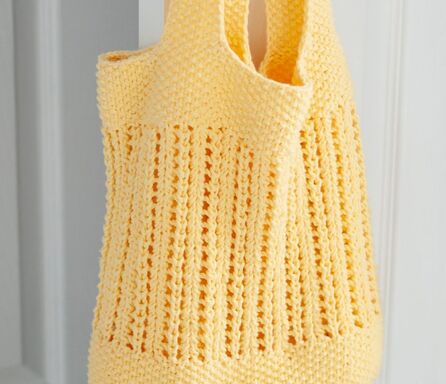
BYOB Market Bag by Moira Ravenscroft, Wyndlestraw Designs
The BYOB Market Bag

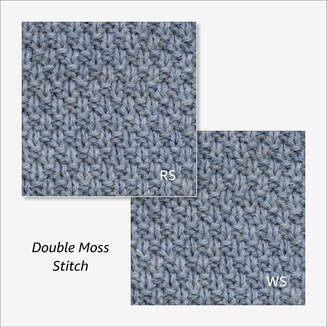
So I hope that has given you lots of ideas for finishing your new BYOB Market Bags. What size to make, whether to use seed stitch or another pattern, length of openwork panel, knitted handles or canvas ones, lined or unlined, inside pockets or not . . .

Certainly there are a lot of options to make just the bag you would like to use for your next trip to the supermarket or to the beach!

Well, I hope you have enjoyed this blogpost series and that it will help you when you are working on your next BYOB Market Bag. For full details of the pattern, please click here. Do make lots for your friends and family too! They would make wonderful gifts for the holiday season.

When I come back next time, I am going to be chatting about some new cushions that I have been making that hope to capture the very essence of summer.

Until then – Happy Knitting!

Moira 
Keywords: Patterns/Bags, Tutorials/BYOB Market Bag Knit-along, 
bag, bags, knitted bag, mesh bag, market bag, lined bag, fabric lining, material liner, canvas liner, cotton lining,

28 September 2013

Market Bag Knit-along #7 - Handles and Finishing

BYOB Market Bag by Moira Ravenscroft, Wyndlestraw Designs
I are continuing my blogposts series looking at tips and techniques for working the new BYOB Market Bag pattern and today I am going to look at handle options – both knitted and purchased.

If you would like to go back to the start of this series and review all the blogposts so far, then please click here for the first of these Tutorial/Knit-along posts and follow the links at the bottom of each page until you get back to this point.

In the last blogpost we were working the central openwork section of the bag and by now you should have arrived at the top band. So now is a good time to double-check the dimensions of your bag and make sure everything is right for you before adding the top band. I am just working a narrow band at the top of my bag, but see what you want to do and make sure your work is the right length at this point.

Then change back to your shorter-length needles as instructed in the pattern and work the top band, making any adjustments for your own gauge and stitch pattern as at the beginning.

Double Handles

So now it is time to add the handles. For this bag, I am going to work two long handles with a button overlap detail on each. So on the next row, we are going to work across the stitches, binding off the sections in-between the handles and leaving the handle stitches on three stitch holders ready to work later.

So go ahead and follow the pattern for the next round, making sure you do not cut your yarn at the end of the round. You will now be at the right point to start work on your handles. I have worked these over 11 stitches, but you can make them narrower or wider as you prefer.

Follow the pattern to commence the handle and you will see that the pattern gives a gentle shaping to form a small rounded "shoulder" from the top of the bag. This also strengthens this part of the handle too.

You will also see that the edges have a neat selvedge to either side. Please refer back to the post on selvedges for more information on this, and as always if you have a selvedge method that you prefer, then please substitute it for the one I have suggested here.
BYOB Market Bag by Moira Ravenscroft, Wyndlestraw Designs – Button detail
Length of Handles

Then having decided on the width of the handle, you now need to decide on the length. Handle length is a very personal thing. Some people like very long handles so that their bags hang at hip-height, others much shorter. So measure an ideal bag that you currently own and see what works for you.

However, the longer the knitted handle the more it can stretch, so you might need to back your handle with cloth or a woven tape if you find that is an issue. Please have a look at the Weymouth Shoulder Bag pattern on my website as an example of a bag where I have added a fabric backing for extra strength. The material was fairly lightweight in that bag, but worked really well to make the handles less stretchy yet still remain nicely flexible.

I want my handles to be a total of 60cm/24 ins long with an overlap so I can add a button detail at one side. So I will make the first side of the handle 40cm/16 ins long plus a small amount for a button tab, and the second side 22.5cm/9 ins long. This will give me 2.5cm/1 in for an overlap to sew the two handles together.

So if you'd like to do this too, work your first handle to the length that you require and then follow the pattern to form a shaped button tab. Then work the second part of the strap as instructed. Position the button tab over the strap just worked, matching the markers and sew through all the layers to secure well before adding the button.

Other options: a) Single Handle 

If you prefer to have a single handle on your bag, then you can modify the instructions above to work just one handle going from one side to the other. Again you can either leave this plain, or back it with cloth or a woven band for extra strength.
Southampton Book Bag by Moira Ravenscroft, Wyndlestraw Designs
b) Fabric or Rope Handles

Or perhaps you would like to use a purchased handle of some kind. There are many available in the stores, or you could salvage an interesting handle from an old bag.

Alternatively, you could use woven webbing for the handles as in the Southampton Book Bag in the photo above. This design has a dyed canvas tote as a liner but I replaced the tote bag handles with longer cotton webbing straps so it could be carried as a shoulder bag.

A similar approach could be used with these Market Bags, attaching the straps to the base and then running them up to the top, sewing straight through the knitted fabric.
Nokomis Beach Bag by Anna Alway, Kiku Knits
Our daughter Anna did this on her Nokomis Beach Bag with the straps exposed on the outside, forming part of the design. In the Southampton Book Bag I also added a webbing key ring tab and that is something that you could do with the BYOB Market Bag too. It is a certainly a convenient place to attach your keys.

Or alternatively, a length of cord or rope in a matching or contrasting colour could be fixed at the base and then woven in and out through the openwork section for a decorative effect. Knot them at the top for an easy and strong set of handles.

Finishing

Sew in all the remaining ends neatly on the inside of your bag making sure to secure them very well and then block into shape. And you're done! I will post one final blogpost in this series with a further suggestion and that is to add a lining to your BYOB Market Bag so you could use it as a day-bag too.

Thanks so much for the messages so far – I am glad you are enjoying making these bags. Make lots and give them to your friends too! The fewer plastic bags we all use the better.

Happy Knitting!
 
Moira 
Keywords: Patterns/Bags, Tutorials/BYOB Market Bag Knit-along,
bag, bags, knitted bag, mesh bag, market bag, bag handles,

21 September 2013

Market Bag Knit-along #6 - The Two-Row SSK

BYOB Market Bag by Moira Ravenscroft, Wyndlestraw Designs
​We have arrived at the sixth episode in the “Market Bag Knit-along” blogpost series, all aimed at looking at tips and techniques for working the new BYOB Market Bag knitting pattern. If you would like to start with the very first episode, then please click here and then follow the links at the bottom of each page until you get back here.

So today, I will be looking at the central openwork panel which makes the bag so beautifully lightweight and flexible. This stitch pattern is a mixture of yarn over increases combined with two different decreases: the k2tog/Knit 2 sts Together and the SSK/Slip, Slip, Knit. The k2tog decrease leans to the right while the SSK goes towards the left, so they are often combined in lace patterns to give mirror image decreases.

However, the SSK decrease is a tricky manoeuvre and so it often ends up elongated or distorted compared to its k2tog companion. The problem comes down to the way in which the SSK is worked, so I am going to suggest an alternative approach – working the decrease over two rounds not just one!
K2tog – diagram by Moira Ravenscroft, Wyndlestraw Designs
The k2tog decrease

So let’s look first at the k2tog decrease. This is easy to work and gives a very neat result. Instead of inserting your needle into just the next stitch, you place it through the next two. Then you knit them together in the usual way. So the technique is very familiar and you don't have to prepare the stitches before working them.
SSK – diagram by Moira Ravenscroft, Wyndlestraw Designs
The SSK decrease

However, when you come to work the SSK decrease this is not the case. To work this decrease, you need to insert the needle into the next stitch as though you are going to knit it but then just slip it from the left‐hand (LH) needle to the right. Do the same again with the next stitch, then pass both of these back to the LH needle.

Now insert your knitting needle into the back of these two sts and knit them together through the back loops (k2tog tbl). This is the SSK decrease – you slip one stitch, slip another, then k2tog tbl.

You can probably see that you can streamline that a bit and not have to actually pass the stitches back to the LH needle to complete the second part of the working, but even so it is a lot of moving of stitches before you get to actually knit them together.

If you are at the right point in your pattern, you could try this out on the first part of the openwork panel. So change to the larger-sized needles as directed and then work around the whole round trying to get this decrease as neat as possible.
Wrapping – diagram by Moira Ravenscroft, Wyndlestraw Designs
Two‐Row SSK

The key part about the slipping of the stitches knitwise is to change the way that they are sitting on the needle – ie to change the 'mount' of the stitch. Before knitting them together, we need to make them sit backwards.

However, that is the place where the stitches can get pulled out of shape. By picking them up, slipping them to another needle and then passing them back again, extra yarn has been pulled out of neighbouring stitches and they have become distorted.

However, there is a solution in that you can prepare for this decrease on the previous round. Try this:
  • Next rnd: *Knit 3 sts by bringing the yarn under the needle in the usual way, then knit 2 sts bringing the yarn over the needle; rep from * to the end of the round. ​

So that's [k3 under, k2 over] all the way around. See the diagram above to see how to work the stitches. 

​It is a little tricky to get your hands to work the knit stitch the reverse way at first, but persevere and soon it will be smooth and quick. You probably even remember doing this when you were first learning to knit and discovered that your stitches weren't always facing the right way!
Two-Row SSK – diagram by Moira Ravenscroft, Wyndlestraw Designs
You will see that in each group of 5 stitches you now have three stitches that face to the L (coloured green) and 2 stitches that face to the R (coloured blue).

Then your next round will be:
  • Next rnd: *K2tog, yo, k1, yo, k2tog tbl; rep from * to end of rnd.

Much simpler and neater. The stitches do not need to be separately manipulated, the k2tog and the k2tog tbl are both quick to work, and the stitches are not pulled or distorted out of shape.

And you can use this technique wherever you encounter an SSK decrease., not just in this pattern but elsewhere too. Just note all the SSK's in your pattern chart and highlight the two stitches in the row or round below. Work them 'backwards' to get them mounted facing to the right and then your SSK will be neat and easy on the subsequent row.

Eastern Uncrossed Knitting

Some of you may by now have realised that you have seen this wrapping technique before. In fact, it is thought that stitches were always worked this way when knitting was first invented! It even has a name in knitting, as this method is called "Eastern Uncrossed Knitting". ​​
Lace Panel showing k2tog and 2-row ssk decreases, BYOB Market Bag by Moira Ravenscroft, Wyndlestraw Designs
Length of panel

So, using whichever method you prefer, continue working this central openwork panel until the bag measures the length you want it to be minus the height for the top band. Again, I am just going to work a narrow top band as I want a nice long openwork section for my bag, but you decide how long you want this to be for your version.

Then next time, I’ll be back to discuss the various options you have for the bag handles.

Happy Knitting!

Moira 
Keywords: Patterns/Bags, Tutorials/BYOB Market Bag Knit-along, Knitting/Tips & Techniques,
bag, bags, knitted bag, mesh bag, market bag, ssk, k2tog, decreases, lace, mesh,

15 September 2013

Market Bag Knit-along #5 - Picking up stitches

BYOB Market Bag by Moira Ravenscroft, Wyndlestraw Designs
So we come to the fifth blogpost in this tutorial/knit‐along series, working the new BYOB Market Bag pattern. And if you're new to this Blogpost series: "Welcome!" Please find the first post in the series here, then follow the links at the bottom of each page until you get back to this point.

Today, we are going to pick up the stitches around the base of our bags so that we can start working the sides.

How many stitches to pick up?

So the first thing you need to do is to calculate the number of stitches you need for your bag:
  • First decide the width you would like your bag to be. Have a look at bags you already have and then see what fits best with your ideas for your new Market Bag.
  • Then for the circumference, you will need 2 x this width.

Now you will need to refer back to your gauge swatch so you can see how many stitches you have in 10cm or 4 ins. I actually find it easiest at this point just to divide that up so you have the number of stitches per cm or inch. That just seems to make the calculation simpler. So if, say, your gauge was 18 sts:10cm/4 ins, then that is 1.8 sts per cm or 4.5 sts per inch. Then:

  • Multiple the circumference for your bag by this gauge and see what that comes to. If it is an even number, then add 1 more stitch as we need a repeat of 2 stitches +1 for Seed Stitch. If you are using a different stitch pattern, then make sure you have the right number of stitches for that.
  • Compare that number to the pattern and then make any adjustments you think you will need for your bag.

Oh and a note on gauge – do remember the old adage: "Your first piece of knitting is a large tension square!" I suppose we more typically say “gauge swatch” these days but the idea is the same.

​The gauge of your main piece of knitting can often vary considerably from your original small sample, so remeasure after a bit just to make sure you end up with the right size of bag. You can always make some small adjustments after a few rounds.
BYOB Market Bag by Moira Ravenscroft, Wyndlestraw Designs
Setting the new Start of Round position

It is best if each round starts at the side of the bag where it is least noticeable. There is often a slight jog where patterns change at the start of a round, and it is also best if new yarns are joined in at the sides too, so they will not be seen. So we need to work around to the middle of the side and then start our new rounds from there.

In the diagram above, we are currently at #1. The last WS row of the base has been worked, and a long‐ish circular needle is ready to commence the pick‐up.

So follow the pattern along to #2, then fold the base in half and place a pin or safety pin at the half‐way point of the first short side, marked as #3 in the diagram. This will be the start of all subsequent rounds in the bag.
BYOB Market Bag by Moira Ravenscroft, Wyndlestraw Designs
Our trusty friend the crochet hook again...

I like to use a crochet hook to pick up stitches, as I find it gives a neater finish. Just make sure to use a hook that has a solid shaft, not one that has a handle on it! Insert the tip of the crochet hook into the space under the first selvedge stitch and draw a thread through, then continue to do the same until you get to your pin‐mark.

Place a marker for the start of the round and then continue to pick up stitches down the side, picking up one stitch for each selvedge stitch. Slip these onto your knitting needle, making sure that the stitches are not twisted.

Hopefully that will give you the total number of stitches you need for the bag, but don’t worry too much if you are still a few stitches short at this point. It is easy to add a few more at each corner on the first round of the pattern. That actually gives a nicely rounded corner for the bag.

Unzipping the Provisional Cast‐On

Now pick up a spare needle and return to the Provisional Cast‐On at the bottom edge. Open up the waste yarn (WY) chain and pull this gently until the yarn end comes free (#4 on the diagram above). Loop this yarn end over the needle and secure it behind with another safety pin. This is the first stitch.

Gently pull the provisional cast‐on chain again and capture the first loop as it becomes detached from the WY. Work across in this way until you have all the stitches on your spare needle.

The next part of the pattern can be a little tight to work, so use the "Half Magic Loop" method to draw out a small section of circular needle cord just behind where you are working to make this easier. Then follow the remaining instructions for the "Transition Round" in the pattern.
BYOB Bag by Moira Ravenscroft, Wyndlestraw Designs
Working the sides

So now is a good time to double-check your numbers before you get going. Have a look at the pattern again and you will see how I increased at the corners of my bag to get to the number of stitches I needed. See how your figures are working out and plan how many more stitches you need at this point too.

And off we go!

And then you're all set. Continue in your pattern until the lower band is the depth you want it to be. For my Market Bag I wanted to have a long central openwork section to give a nicely flexible bag able to accommodate awkwardly shaped vegetables at the Farmers' Market, so the base of my bag is fairly shallow. However, please feel free to adapt this to your own preference.

Then on the last round you’ll need to decrease or increase the number of stitches at the end of the round so that you have a multiple of 5 sts +0 for the central openwork pattern. Again refer back to the pattern so you can see what I have done and then plan what you need to do for your bag.

Next time...

When we come back next time we will be work the central openwork pattern and I am going to introduce a new technique for working the SSK / Slip, Slip, Knit decrease. See you next time for this "Two Row SSK"!

Happy Knitting!

Moira 
Keywords: Patterns/Bags, Tutorials/BYOB Market Bag Knit-along,
bag, bags, knitted bag, mesh bag, market bag, picking up stitches, provisional cast-on, bag size,

09 September 2013

Market Bag Knit-along #4 - Stitches and Selvedges

BYOB Market Bag by Moira Ravenscroft, Wyndlestraw Designs
We have now reached the point in this Tutorial/Knit‐along series where we can actually start knitting our BYOB Market Bag!

And if you have missed any of the three preceding blogposts in this series, then please click here to read the first blogpost in the series, "Pre‐washing your yarns" and then follow the links at the bottom of each page to get back to this point.
Double Moss Stitch taken from Reversible Knitting Stitches by Moira Ravenscroft & Anna Ravenscroft, Wyndlestraw Designs
Stitch Patterns

The base and lower section of the bag features Seed Stitch, which is an easy‐to‐work pattern giving a firm finish and attractive texture. I have to say I love this stitch. It's one my favourite "Zen" stitch patterns, where it is possible to totally immerse myself in an audiobook or watch a movie while productively knitting away.

However, you can choose any stitch pattern that you like as long as it is fairly firm. It is surprising how different you can make something look with only a small change such as this!

I chose Seed Stitch from our Reversible Knitting Stitches book but if you would prefer another stitch, then have a browse through that and you’d be sure to find something. For example a good alternative would be Double Moss Stitch shown in the photo above, but you decide what you'd like for your bag.

You will need to work a tension swatch in the pattern of your choice and also make sure that the number of stitches is right for your pattern repeat. Seed Stitch, for example, has a repeat of 2 sts +1 but if your pattern has a different repeat then you would need to adjust the number of stitches to allow for that.
BYOB Market Bag by Moira Ravenscroft, Wyndlestraw Designs
Selvedges

Selvedges [also spelled Selvages] are worked at each side of the knitting to give a neat edge from which stitches can later be picked up. The instructions in the pattern use the "English Selvedge" which is to knit the first and last stitch on all the Right Side rows, and then slip them on all the Wrong Side rows. The slipped stitches are worked without twisting (ie slip as if to purl).

This gives a neat series of slightly‐elongated knit stitches on the edge of the fabric as you can see in the photo above. When you are ready to pick up the stitches along this edge, it is easy to insert the knitting needle into the spaces between as the selvedge stitches are only worked on every other row.

Of course, if you have another favourite way of working your selvedges, then please do feel free to use that instead. As long as you have a neat edge, then it doesn't matter which method you use.

How many stitches?

The BYOB Market Bag has a neat rectangular base which is perfect for carrying around at a Farmers' Market. Have a look at the pattern and see if you like the dimensions that I have worked or if you would like something a little different.

If you wish to work a different sized base, or if your gauge is different from the pattern, then you may well need to cast on a few more stitches than I have suggested or a few less. So have a quick think before starting to make sure this first part of the bag is right for you.

And so to the bag . . .

Although the base is worked flat, it is a good idea to use circular needles at this point as they will be needed once we start working up the side. Also, I suggest that you start with needles at least 80cm/32 ins long as we will need the extra length when we come to picking up the stitches for the sides (more on this next time).

So, using the Provisional Cast‐On method of your choice and Waste Yarn, follow the instructions in the pattern for working the base of your new bag. 

See you next time once you have your base knitted!

Happy Knitting!
 
Moira 
Keywords: Patterns/Bags, Tutorials/BYOB Market Bag Knit-along,
bag, bags, knitted bag, mesh bag, market bag, cotton, yarn, stitches, knitting stitches, reversible stitches, selvedges, selvages,

06 September 2013

Market Bag Knit-along #3 - Provisional Cast Ons

BYOB Market Bag by Moira Ravenscroft, Wyndlestraw Designs
I am continuing my tutorial / knit-along series for knitting a new long-handled bag, the BYOB Market Bag. If you have missed the previous two posts, then please click here to read the first blogpost in the series, "Pre‐washing your yarns" and then follow the links at the bottom of each page to get back to this point.

So, we have our yarns washed, dried and prepared and we have a good big sample for a gauge swatch, so now let's turn our attention to how we will be casting on for our new bags.

Why use a Provisional Cast‐On?

In the pattern, I have suggested that you start with a Provisional Cast‐On. This is an excellent way to start a piece of knitting with an edge which can be undone later. You will then have "live" stitches which can be picked up and worked in the opposite direction. You can see this cast-on in the photo above as I have used a contrast-coloured blue yarn which will then be undone later..

The Provisional Cast-on is useful in many situations, such as working a scarf from the middle out so that both sides have the pattern worked in the same direction. Or you could use this method to start the rib at the bottom of a child's sweater. When you need to make the item a little longer, you can easily remove the rib and add a little more fabric.

Here are some of the many ways that you can work a Provisional Cast‐On.
Crochet Provisional Cast-On, diagram by Moira Ravenscroft, Wyndlestraw Designs
a) The Crochet Provisional Cast‐On

My favourite Provisional Cast‐On is worked with a crochet hook! This is a variation of a technique also known as the Japanese Cast‐On. The provisional version uses two yarns, a Waste Yarn at the beginning and then the Main Yarn following on from there.

So, start with a length of smooth, contrast‐coloured Waste Yarn (WY), shown here in green, and crochet a few chains. Bring your knitting needle into position and hold it in your left hand on top of the yarn.

Tension this yarn end with your left hand, then using the crochet hook, hook the thread over the top of the needle to form the next crochet chain. Flip the thread under the knitting needle again and repeat to make the next chain.

You will see that you are forming a series of WY stitches directly onto the needle and there is a neat chained edge along the bottom. Cast on all the stitches you need, then work a few more chains away from the needle. Pull the last loop a little larger and tighten it so it will not come free while you work. Now bring in your Main Yarn and knit the first row, then continue in your chosen pattern starting with a WS row.

Here's an excellent video from Lucy Neatby showing this method. She starts with a slip‐knot whereas I prefer working a few chains to start off with, but otherwise the methods are the same.

Later, you can return to the crochet WY chain and pull it out from the knitting, capturing the loops one by one as they "pop" off the chain.
Two-step Provisional Cast-On, diagram by Moira Ravenscroft, Wyndlestraw Designs
b) The Two‐step Crochet Provisional Cast‐On

This is actually the same as in (a) but is worked in two stages. Firstly, loosely crochet a chain with the WY, allowing one chain per stitch to be cast on plus a few extra at each end. Now look at the back of the crochet chain you have just worked. You will see that while the front is a lovely flat set of "V" shapes, the other side has a bump at the back of each stitch.

Pass the tip of your knitting needle into the space behind one of these bumps, as in the blue arrows in the diagram above, then draw the main yarn through to form the first stitch. Continue picking up stitches directly into the crochet chain until you have the number required. Then start your chosen pattern with a WS row.

Capturing the Provisional Cast‐On stitches later is the same as in (a).
Two-step Provisional Cast-On, diagram by Moira Ravenscroft, Wyndlestraw Designs
c) False‐start Provisional Cast‐On

This is a method used by machine knitters but can also be used for hand‐knitting too. In machine knitting it is usually called the Waste Yarn / Ravel Cord Cast‐On.

Start by casting on the number of stitches that you need using any regular cast‐on and some spare yarn. This will be unravelled later and can be used again. Work in stocking stitch for a few rows, ending with a RS row. Then change to a smooth, contrast‐coloured WY and work 1 more row (shown in red above). Bring in the Main Yarn and knit one row, then continue in your chosen pattern starting with a WS row.

Later, pull out the smooth yarn (the Ravel Cord), one stitch at a time, and capture the Provisional Cast‐On loops. This is a little slower method, both to start and to unravel, but is very easy and gives a neat result.
Two-tail Provisional Cast-On, diagram by Moira Ravenscroft, Wyndlestraw Designs
d) Two‐Tail Provisional Cast‐On

This is a variation of the Two‐Tail Cast‐On or Thumb Cast‐On that most knitters know. In fact, many knitters only ever cast on in this way, as it is so versatile.

In this provisional version you will be using two strands of yarn, a WY end and a Main Yarn end. Take both yarns together and make a slip knot. Place this onto the needle and loop the WY around your thumb. If you are an English / American style knitter, throw the Main Yarn around the needle in the usual way to form the stitch. If you are a Continental style knitter, then tension the Main Yarn on your index finger and pick this first stitch. Continue casting on until you have the number of stitches required, not counting the slip knot, then drop the WY.

Next Row (WS): Commence your stitch pattern and work until you reach the slip knot, then drop this off the end of the needle.

Now you can continue on working in your chosen pattern. When you want to capture the provisional cast on stitches, undo the slip knot, gently tease the WY out and capture the live loops. Continue unpicking the WY across the row, trimming this on occasions so that you don't have to pull too much yarn through each stitch.

This is a good provisional cast on and does not come undone suddenly (as can happen with the Crochet Provisional Cast‐On!) but it does take longer to capture the stitches at the end.

You can use this idea of using two yarns instead of one to make a provisional variation of many different cast ons. Have a look in your favourite knitting book and see how easy it would be to work this variation in an Italian or German Cast‐On, for example [Ref 1].

JMCO / Judy's Magic Cast‐On

Judy Becker published a new provisional cast‐on in 2006 which developed some of the ideas from the cast‐ ons above. It has proved extremely popular and has become known simply as Judy's Magic Cast‐On, or just JMCO for shortThis produces an excellent cast‐on for toe‐up socks, bags and other items where an invisible cast‐on is required.

It is easiest to work using a circular needle since the back needle tip can be pulled out of the way after the cast‐on, slipping the stitches onto the needle cord behind. Then it is easy to work the first round of stitches.

Descriptions or drawings of the technique can appear a little confused. However, there are many videos of theJMCO, so look at these to see how this might be a good technique to use in your next project. I like this video by Ann Kingstone as she explains the technique excellently.

A Note on Capturing the Stitches at the end

Many of the Provisional Cast‐On methods produce an end stitch which is easy to lose when you come to capture your stitches. In the Crochet Provisional Cast‐On, for example, your very first "stitch" is actually the yarn end hanging at the end of the 1st row. Loop this around your pick‐up needle as you start and pin it into place behind to form the stitch. Then your stitch count will be right. If you forget to do this you will find you are one stitch short!

This has to do with that old Maths question of "How many spaces are there between 6 lamp‐posts?" [Answer = 5!]  Isn't it fun delving back into the dim recesses of the brain to remember old Maths lessons... Finally they have found a use after all those years!

Have fun exploring these many different ways of casting on provisionally and finding which one suits you best. In the next blogpost in this series, we'll make a start on knitting our bags.

Next time …

Next time, we'll be making a start on knitting the bag, with a look at the stitches you can use and a some notes all about selvedges.

Until then – Happy Bag Knitting!

Moira


References:
1. Montse Stanley, "The Handknitter's Handbook", pub by David and Charles 1993, Pg 67‐82.
Keywords: Patterns/Bags, Tutorials/BYOB Market Bag Knit-along,
bag, bags, knitted bag, mesh bag, market bag, cotton, yarn, gauge, bag size,

LinkWithin

Related Posts Plugin for WordPress, Blogger...