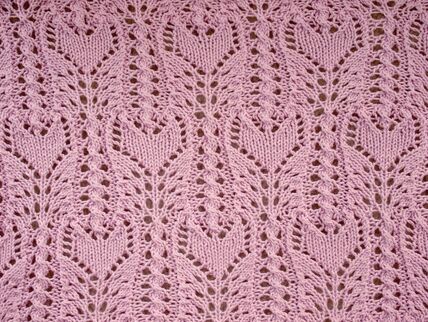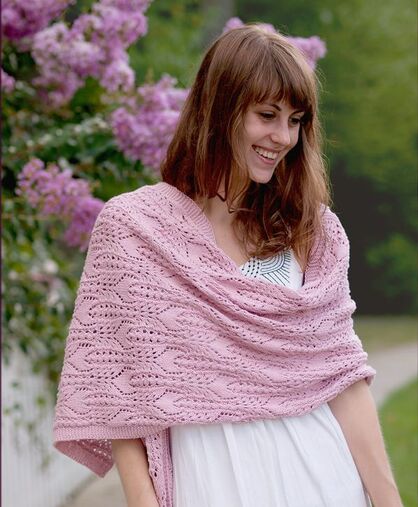
Knitting lace is fascinating – watching the yarn overs and decreases marry together as you work to form wonderful shapes and designs. You can add small, wide‐spaced holes into a baby blanket and bring a lightness and airiness to an otherwise solid fabric. Or you can place holes in sequences to make patterns that seem truly organic, as in the tulip lace pattern for the FFCT Wrap above.
There are also some knitting patterns that seem to have more holes than material! The soft lace shawls from the Shetland or Faroe Islands are an example, just floating over your shoulders like a breath of warm air.
The holes in these designs are formed by taking the yarn over the needle, or just yarn over for short. But did you know that there are a number of ways to work these?
In fact there are four basic types of yarn overs depending on what goes before and what goes afterwards in the row as well as some special cases that I'll detail below. Knowing the differences between these different types of yarn‐overs gives you a lot of choices as you work to select just the right 'look' for your next lace project.
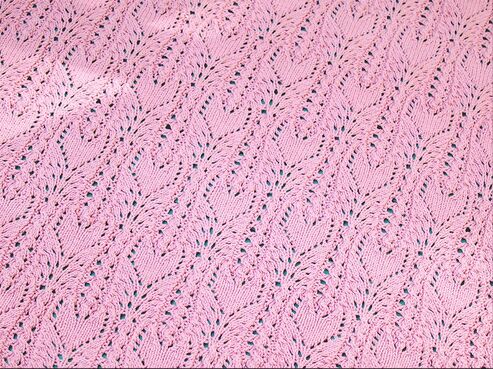
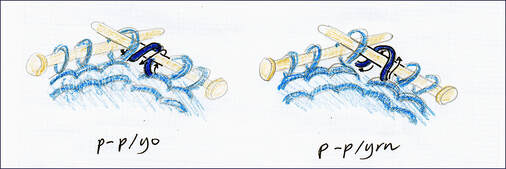
#1 ‐ Between Knit Stitches:
If you need to insert an eyelet hole between knit stitches you have two options. For a small, neat hole you can bring the yarn forward to the front, just as you would to work a purl stitch. Now take the yarn in front of the needle and over the top so that it is ready to work the next knit stitch.
This is the basic, simple yarn over (yo), also referred to as a throw in older patterns and also sometimes abbreviated to yarn over needle (yon). You then continue on your way, patterning to the end of the row. On the next row, you work the yo in the same way as a regular stitch, taking care not to twist the thread as this would close the hole up again.
There is also another choice to make a lace increase between knit stitches and that it is the yarn round needle (yrn). In this version, the yarn is brought from the back where you have just been working over the top of the needle to the front, then around the needle and under to the back again. The yarn has now completely encircled the needle and is ready to work another knit stitch. The amount of yarn taken to work this type of yarn over is much greater than in the first option and produces a more emphatic hole.
A simple change like this can produce a very different‐looking item. The smaller yo might be better in some situations, but in others this neat little hole can get lost in the design and a larger yrn would be a better choice. You will sometimes be directed by the pattern designer to work one type or another, or you may see yarn forward (yfwd) or yarn back (yb) as instructions on what you should do at various points in the pattern.
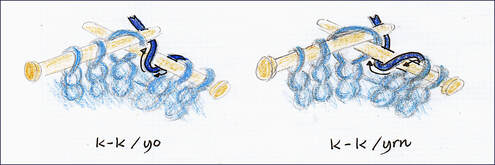
#2 ‐ Between a Knit and a Purl:
After working a knit stitch your yarn is at the back and you need to bring it forward ready to work the purl stitch, but with extra yarn inserted to form the hole. The simplest way to do this is to take the yarn over the top of the needle instead of underneath it. This puts a very small eyelet hole in place but is not always satisfactory as the yarn can tighten up and give the effect of a distorted purl stitch instead of a hole. However, it is useful for small delicate items and can work well with care.
The more regular approach is like the yrn in the previous section. Bring the yarn forward just as though you are going to work the purl stitch without a lace increase in front. Now take the yarn up over the top of the needle to the back and then under again to the front. The action almost feels as though you are wrapping the yarn twice around the needle, but in reality it is only going around once.
Now work the purl stitch in the usual way. Keep the yarn fairly tight through the whole of this manoeuvre to ensure that the yarn over does not become too large in comparison to other lace holes in your work.
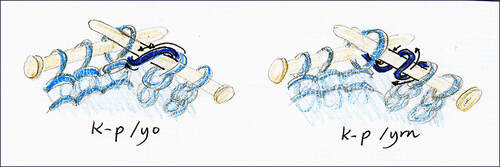
#3 ‐ Between a Purl and a Knit:
After working a purl stitch, you can take the yarn over the top of the needle ready to work the next knit stitch. This will give a small, neat hole. However, as in the previous section, this is not always successful as the yarn over can get lost and look like poor tension instead.
A more satisfactory lace increase is formed by taking the yarn under the needle to the back of the work, then up over the top of the needle to the front and around underneath to the back again ready to work the next knit stitch.
As before, keep the yarn fairly tight through the whole of this procedure from working a firm purl stitch before, wrapping the yarn around the needle and then the next knit stitch. Think of the 2 stitches and the yarn over as one unit and maintain a good tension through the whole sequence for a good result.
#4 ‐ Between Purl Stitches:
You can work this increase in two directions: either take the yarn back under the needle and then over the top ready to work the next purl stitch.
Or go from the first purl stitch and take the yarn over the top of the needle first. Then bring it around the back of the needle and under again to the front.
There is little real difference between the two but one may suit one person better than another. The second seems to be marginally longer than the first but this is not as marked as in some of the previous examples. You just need to be careful when working the next row so you do not twist the stitch and close up the hole. You will soon see if you are getting little 'crosses' instead of holes!
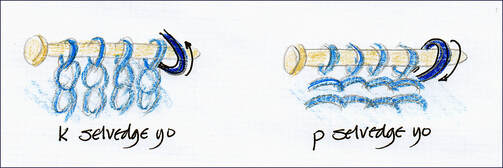
#5 ‐ Increases at the start of a row:
Just occasionally, you will need to make a yarn over at the start of a row. This might be part of a pattern as in Brioche stitch, or to give a decorative finish to the selvedge. The easiest way to do this is to take the yarn to the opposite side from where you should be holding the yarn.
So to work a yo + knit stitch at the start of a row, hold the yarn to the front of the needle, insert the needle into the stitch ready to work, and take the yarn over the top of the needle to insert a yarn over. You may also see the instruction to start the row with yarn in front (wyif).
To work a yo + purl at the start of a row, keep the yarn at the back and bring it over the top of the needle before working the purl stitch. You might also see the instruction to start this row: with yarn in back (wyib) or sometimes that is written with yarn at back (wyab). These yo's can easily get lost on the next row so make sure you remember them when you work the next row.
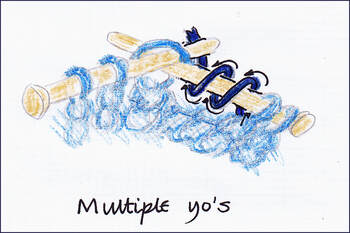
#6 ‐ Multiple yarn overs:
For large‐scale holes in the fabric, the yarn can be wrapped any number of extra times. You may see the instruction: Knit the next stitch, wrapping twice or wrapping 3 times etc. To do this, start with a basic yrn and do that all over again as many times as required.
Sometimes these extra wraps are dropped in favour of a single stitch, but they can also be a way of increasing the number of stitches too. You will probably then be directed to first purl, then knit into the multiple yarn overs on the next wrong‐side row.
For shawls and capes, these various increases can be used to shape the garment, while in flat pieces of knitting such as the FFCT Wrap the increases are matched by decreases along the row so that each pattern repeat has the same number of stitches at the start.
Enjoy trying all these different types of yarn overs as you work your next piece of lace knitting!
Happy Knitting!
Moira
 | Previous Blogpost: The murmur of a cool stream Next Up: Blanket Coverage Our book: Reversible Knitting Stitches My Website: www.wyndlestrawdesigns.com |
Keywords: Knitting/Tips & Techniques,
YO, yarn over, yrn, yarn round needle, lace, lace knitting, knitted lace, mesh,
YO, yarn over, yrn, yarn round needle, lace, lace knitting, knitted lace, mesh,